The Basics of the Fable Maker Editor
Hello Fablers ( That's my new name for Fable Maker users. You like it?... No?... Well. I'm keeping it anyway. :P )
Firstly, Happy New Year! (And Decade) Time sure flies, I hope 2020 will be a good year for everyone. I plan to continue improving Fable Maker, who knows how great it will be by the end of this year.
Now onto the reason for this post, here is the first tutorial post for Fable Maker since it can be a bit daughting to get into it on first look, but it is actually very easy once you understand how everything works together. This post will cover the super basic elements of the story editor, but it should be enough to get started creating your stories. I'll try to cover everything in as much detail as possible, so sorry if it waffles on a bit but I just want to explain every part as much as possible.
If you need further help, you you can hover over any of the buttons or column headers and a tooltip will pop up briefly explaining what each thing does.
Editor:
Firstly, let's start with the editor layout. Everything is labled so it shouldn't be too hard to figure out, but I'll explain everything anyway.
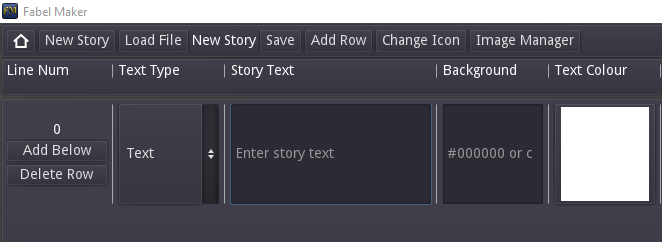
You will be greeted by this screen when you first start creating a new story. The top toolbar gives you familiar buttons which will save, load and start a new story. To the right of the "Load File" button is the name of the current story that is loaded. If no story is loaded, the name will be "New Story" as seen above.
The "Save" button does exactly as you'd assume. It saves your story to the user files directory. When you save your story for the first time, you must input a name before confirming the save. After you've saved your story once, you can then use the shortcut Ctl + S to quickly save your story. (Mac shortcut not currently implemented but will be in the future) You will not be able to import any custom assets until you have saved your story at least once.
The "Add Row" button will add a blank row at the end of your current story. You can also use the shortcut Ctl + D to add more rows quickly. (Mac shortcut not currently implemented but will be in the future)
The "Change Icon" button allows you to set the icon for your story that will appear when looking at the saved games list when loading a story. There is no significance to adding an icon except that it will help you differentiate your story in the save list. Any image you add using the "Change Icon" button, will rename that image to "icon.png" and also overwrite the previous "icon.png" if there was one so be careful!
The final button in the toolbar (for now) is the "Image Manager" button. As the name suggests, it allows you to manage and add custom images for you to use in the story. It is fairly self explainatory, you can add images and delete images within the manager. But, similar to the "Change Icon" button, if you add an image that has the same name as one that is already in the list, it will overwrite the older image. If requested, I could make it so new images will not overwrite old images, but at the moment that doesn't feel like a huge issue for me.
There will also be an "Audio Manager" button added in the near future, I will explain how it works when that feature is released. but like the other features, it is fairly self explainatory.
----------------------------------------------------------------------------
----------------------------------------------------------------------------
Storyline Row Basics:
Storyline Rows are the rows where you actually write the contents of your story. I won't cover every single column in this tutorial post as some will need a whole post of their own. But I will cover the basics for you to get started.
Each row is given a unique number as you can see in the "Line Num" column. In the line Num column you also have the "Add Below" and "Delete Row" buttons for each row. The "Add Below" Button allows you to insert a new row below the one you clicked on. The new row will be a duplicate of the row you clicked to make it easier to keep parameters the same between rows. The "Delete Row" button is self explainatory, but all rows will update their row number and any conditional or skip numbers which may have been set previously, so you don't need to worry about ruining story skip points by deleting rows.
The next column is "Text Type" Which is a very important row that tells the story engine what to do with this particular row. Below I'll explain each text type:
- Text: The "Text" type is the default and treats the current row as a normal text line with no alterations. It does accept images as well though.
- Skip: The "Skip" type is used to tell the engine that there is the possibility that the story needs to skip to a different row number at this point. In the most basic use case, all you need to do is set the "Text Type" as Skip, then type in the "Skip Position" column the row number that you want the story to skip to after this current row. there are more complex skip uses, but I'll save that for another tutorial.
- Option: The "Option" type is used to set an option that the player will be able to input. On an Option row, you must type the actual option you want the player to type inside the "Option" column. This allows you to add more information about the choice to the text column. You must also enter a number in the "Skip Position" column, as that will be where to story skips to after that option is chosen by the player. You can have as many option rows as you'd like before the engine reaches a "Break" type, which will be explained next.
- Break: The "Break" type is only used in conjunction with the Option type rows. The Break row will pause the story at that point and wait for a player input. For a Break Type to work correctly, you need to make sure that some Option Rows were provided before the break point. (It doesn't have to be immediately before the break point) After a valid input is detected by the engine, the story will continue and the previous options that were set will be cleared, so you will have to add options again before setting another Break row. The "Text" column in Break types does not display.
- Space: The "Space" type can be used to change parameters like background images/ colour, set variables, change variables, play sound effects, etc without sending any text to the player. You can also use the Space row to add comments in your story that will not be visible to the player, but will be visible within the story editor.
- Input: The "Input" type allows you to capture whatever text input the player wants to enter and saves it within a variable of your choice. Similar to the Break type, the Input type will pause the story until the player inputs some text/ numbers. To save the players input to a variable, all you have to do is put the variable name in the "Action" column. No function format needed.
Quicktime: Not a feature yet, but planned. This row type will allow for a quick time event to occur within your story, where the player will need to choose an option before time runs out.
That's the basics of writing a story within Fable Maker. This post should give you enough information to create basic branching narratives. There is a lot more you can do with Fable Maker, but I'll leave that to more tutorials in the future. I hope this post was informative. If you feel it didn't explain anything too well, let me know in the comments and I'll try to help. Constructive criticisim on how to make my tutorials better would also be appreciated.
That's all for now, have a good new year!
CDcruz.
Leave a comment
Log in with itch.io to leave a comment.